Tuesday, August 30, 2011

Tasty Tuesday--Chocolate Ganache Cupcakes

This weekend was Andy's birthday. He has one more year until the big 3-0! Uh oh! Anyway, to celebrate, we spent Sunday with the family at my parents' house. I made Andy these Chocolate Ganache Cupcakes, and they were delish.  I love chocolate ganache, and (bonus!) it's so much easier to prepare than buttercream frosting!


For the Cake
3/4 cup boiling water
3/4 cup unsweetened cocoa powder
6 oz. butter, room temp. (a stick and a half)
2 cups sugar
1 teaspoon salt
1 teaspoon vanilla extract
3 large eggs
2 1/2 cup cake flour (I used all-purp.)
1 teaspoon baking soda
1 teaspoon baking powder
1 cup buttermilk

Preheat to 350. Whisk together boiling water and cocoa powder until smooth; cover and set aside.  Cream butter, sugar, salt, and vanilla extract. Add eggs, one at a time, and continue creaming until light and fluffy. In a separate bowl, combine flour, baking soda, and baking powder. Add this, alternately with buttermilk, to the butter mixture. Once well combined, add the cocoa/water mixture and mix well until combined. Scoop into lined muffin tins and bake 15-20 minutes, until toothpick inserted in middle comes out clean. Cool completely before adding ganache.

Chocolate Ganache
12 oz. semi sweet chocolate, coarsely chopped
1 cup heavy cream

Over medium heat, heat cream just until it starts to bubble (don't let it burn!). Pour the warmed cream over the chocolate and whisk until smooth. The longer you let it sit, the thicker it will be.

Once the cupcakes are cooled, just dip them in the ganache.


The best part of the day was that we got to see our sweet niece, Lucy. She is the most beautiful little girl in the world!


Monday, August 22, 2011

Perfect Filet Mignon

The ONLY way I prepare steaks. Perfect every time.


What you'll need:

2 filets mignon, 1 1/2 inch thick
salt and ground pepper
vegetable oil
cast-iron skillet (mandatory!)

Bring steaks to room temperature (remove from fridge about 30 minutes before cooking). 

Preheat oven to 500 degrees. Place the cast-iron skillet in the oven while it is preheating. Pat steaks dry with paper towels, and season with salt and pepper. Brush both sides of the streaks with the oil. When the oven is preheated, remove the skillet from the oven and place on the burner over high heat (high heat sears the outside perfectly and seals in the juices!). Sear the steaks for about 1-2 minutes, flip and repeat on the other side. Transfer the steaks, skillet and all, into the preheated oven. 
Roast for:

4-6 minutes = rare
6-8 minutes = medium rare
8-10 minutes = medium
10 or more = hockey pucks

Cooking times will vary depending on the thickness of the steaks.
Remove from the skillet onto a plate and let tent loosely with foil for about 5 minutes before serving.

Also, if you really want to kick things up, I suggest you order some of this 


from here and use it instead of the salt and pepper.
 This seasoning is also good on hamburgers.

Sunday, August 14, 2011

back to school...here goes nothin.


Billy says it best...

Wish me luck as I start a new year with a brand new crop of third graders!

Saturday, August 13, 2011

bad, bad blogger. and a cute DIY

That's me. I've been a terrible blogger lately. Last week was our first week back for teachers and to say I've been busy would be an understatement. However, my classroom looks better than ever and I {kinda} feel ready for the little kiddos to come on Monday. I'll post pictures of the room later.

On to the DIY project.


I actually made these cute nautical rope things a while back, but kinda forgot about posting about them. They're bigger than they look in the picture.  I first saw something similar to these on a wall in a restaurant downtown Charleston. They were so cute and I knew they'd be super easy to make. I was right.

What You'll Need
cardboard
rope (really cheap from Lowe's)
hot glue
scissors

All you do to make these is hot glue the rope down in a spiral onto a piece of cardboard. Then, cut the cardboard so that you cannot see it behind the rope. To hang it, hot glue a picture hanging hook to the back. That's it! You do have to hot glue the rope in sections and hold it down so that it stays in the tight circle. 
I made three total, all different sizes. And I'll probably make more for our guest bedroom.

Tuesday, August 2, 2011

Tasty Tuesday--Pasta ai Quattro Formaggi

Andy has been out of town for the last couple days and the only good thing about my husband not being here, is that I finally got to make this pasta dish that I've been wanting to make FOREVER! Andy isn't a big fan of cheese, and this one has 4 different types. And it was heaven. Fattening heaven.
The recipe came from the pioneer woman, although I didn't use the exact same cheeses. You can use any cheeses you'd like!


1 lb. Angel Hair pasta
1/2 cup grated Fontina cheese
1/2 cup grated Parmesan cheese
1/2 cup grated Asiago cheese
1/2 cup grated Gouda cheese 
2 Tablespoons butter, softened
1 cup heavy cream
1 whole garlic clove, peeled
1/2 teaspoon salt, more to taste
Freshly ground black pepper

Heat cream in a small saucepan over low heat. Rub garlic clove all of the inside of each serving bowl.
Cook pasta according to package directions in lightly salted water, al dente (about 5 minutes). Do not overcook! *Reserve a few cups pasta water*, drain pasta, then return to the cooking pot. Add butter, pour in cream, and add cheeses and salt and pepper. Stir gently to combine, adding reserved hot pasta water as needed for consistency (I used tongs to stir in cheeses which made it easier.) Taste and add more salt if needed. Mixing stage should happen very quickly. Serve in the garlic-rubbed bowls.

*I (surprise, surprise!) forgot to reserve the pasta water--even though I had it written in ALL CAPS, so I just heated up some water in the microwave to add for consistency and it worked just fine!

Monday, August 1, 2011

Crate Seats, My Way.

In other words, the wrong way. A lesson that you'd think I would have learned by now: read the directions before starting a project...simply looking at a picture isn't enough. Usually. Okay, I'm going to go ahead and be honest. I'll never learn this lesson. I am like a man in this way. Directions are for losers!

Anyway, I first got the idea to make these crate seats from a post on pinterest. They are seats for kids made out of file crates--you just make a cushion for the top. I saw the picture and thought "those are really cute and would be great for my classroom library, but are they worth making?". Then, my uber crafty friend, Emily, sent me a picture of crate seats she had made and they were absolutely adorable. She said they were super easy to make, so I immediately went out and got the materials to make some of my own. It was an adventure, to say the least.

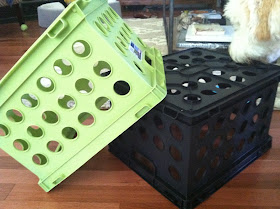
So, I headed off to my least favorite place in the entire world--Walmart. I truly despise Walmart, but that's a whole other can of worms that we don't need to bring up. At hell Walmart, I picked up file crates, fabric, and a foam mattress pad. Birdie helped.


Then, I headed down the road to Lowe's for the plywood and staple gun. I thought I was a smartie and measured the crates while at hell Walmart, but here is where things went downhill. I measured the bottom of the crate. The bottom. Think about this. The point of these lovely seats is not only to provide a comfy place to rest your hiney, but also to use as storage. I was supposed to measure the TOP so that the cushions rest on the top and can be removed to store items inside the chair. DUUHH! Blondie here didn't think that far. So, my plywood cushion bases were cut too big. Which led to more problems down the road. 
After having my lovely male Lowe's worker wearing skinny jeans, Sperry "boots", and a tight Michael Jackson-esque jacket (not your typical Lowe's guy), cut my plywood I found another lovely Lowe's worker to point me in the direction of the staple guns and I was on my way. 

So here's how it went from there:

Step 1: grabbed my plywood...
 cut the foam to size....

Step 2: cut the fabric to size. This is when I realized the lovely girl at Lowe's gave me the wrong staples. So, instead of heading back to Lowe's to easily fix the problem (Lowe's is literally 5 minutes from my house), I took the lazy route and pulled out my glue gun. 

There's nothing a glue gun cannot fix!
words to live by.

Step 3: staple fabric to plywood. Hot glue fabric to plywood.
 Viola! A cushion!

step 4: rest cushion on top of crate for easy removal. Hot glue cushion to bottom of crate.
The finished product. Pretty darn cute, even if they don't completely serve their purpose!

So, if you're a teacher or mom and you decide to make these, I recommend the right way. 
Not Caro's Way.